
Mount kitchen cabinets by mounting a level ledger, finding studs, and screwing cabinets securely to studs.
I have guided dozens of homeowners and remodeled kitchens while teaching carpentry classes. This guide explains exactly how to mount kitchen cabinets with clear steps, real tips, and common pitfalls to avoid. You will learn how to mount kitchen cabinets from planning and layout to final leveling and security. My instructions draw on field experience and best practices to help you finish the job safely and well.
Tools and Materials Needed
You will need a compact set of tools and materials to mount kitchen cabinets. Gather the items before you start to save time and reduce mistakes.
- Tape measure for accurate layout and spacing.
- Level and laser level for straight lines.
- Stud finder to locate wall studs.
- Drill and impact driver with screwdriver bits.
- Long cabinet screws, 2.5-3.5 inches long.
- Clamps and cabinet jack or support ledger.
- Shims, wood glue, and caulk for small adjustments.
- Safety gear: gloves, eye protection, and a dust mask.
I always check tools and run a quick trial assembly on the floor. This helps me mount kitchen cabinets faster and with fewer surprises.

Planning, Measuring, and Layout
Good planning makes installation smooth. Measure twice and plan the cabinet layout on paper and on the wall.
- Sketch the kitchen and mark the locations of appliances and plumbing.
- Measure cabinet widths and add spacers for filler pieces.
- Mark the top line of wall cabinets at the desired height. Common height is 18 inches above countertop.
- Confirm that outlets and plumbing do not obstruct cabinet backs.
When you plan how to mount kitchen cabinets, decide whether to use a ledger board and how to route wiring and pipes. That choice affects wall preparation and the order of work. I once adjusted a layout to avoid a hidden pipe. That saved hours and prevented damage.

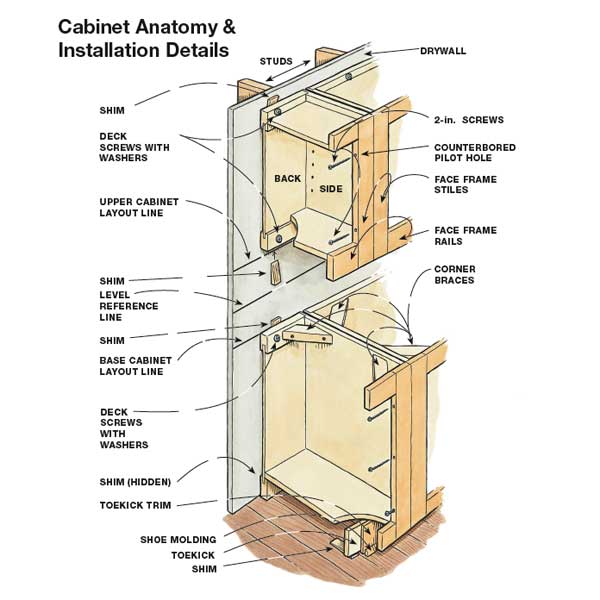
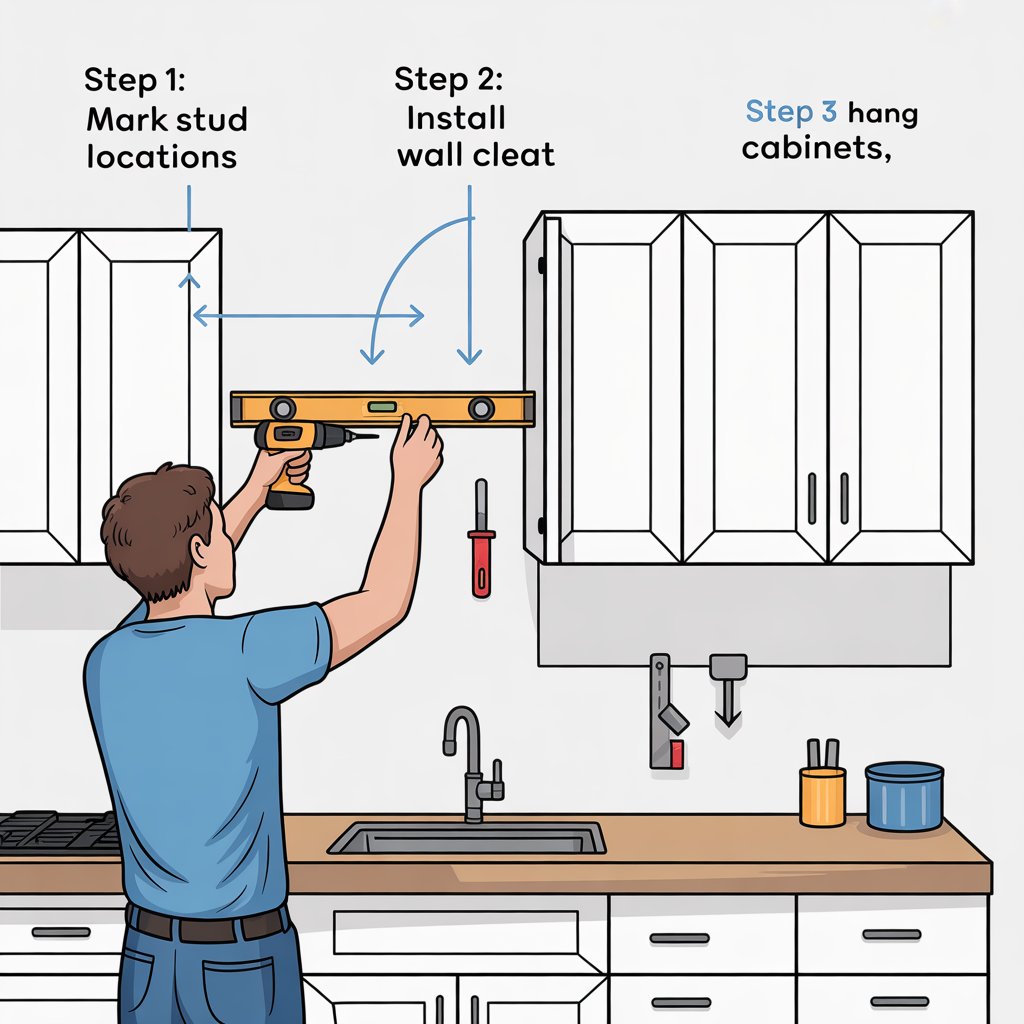
Preparing the Wall and Finding Studs
A strong connection to studs is key to secure cabinets. Use a reliable method to find and mark studs.
- Use a stud finder and mark stud centers with a pencil.
- Confirm studs by drilling small test holes if needed.
- Remove old cabinets, drywall patches, or loose plaster where cabinets will mount.
- Clear the wall and check for plumbing or electrical behind the surface.
When you know how to mount kitchen cabinets to studs, you reduce risk of sagging. In tight kitchens, I sometimes add blocking between studs to gain extra support. This is especially helpful with heavy wall cabinets.
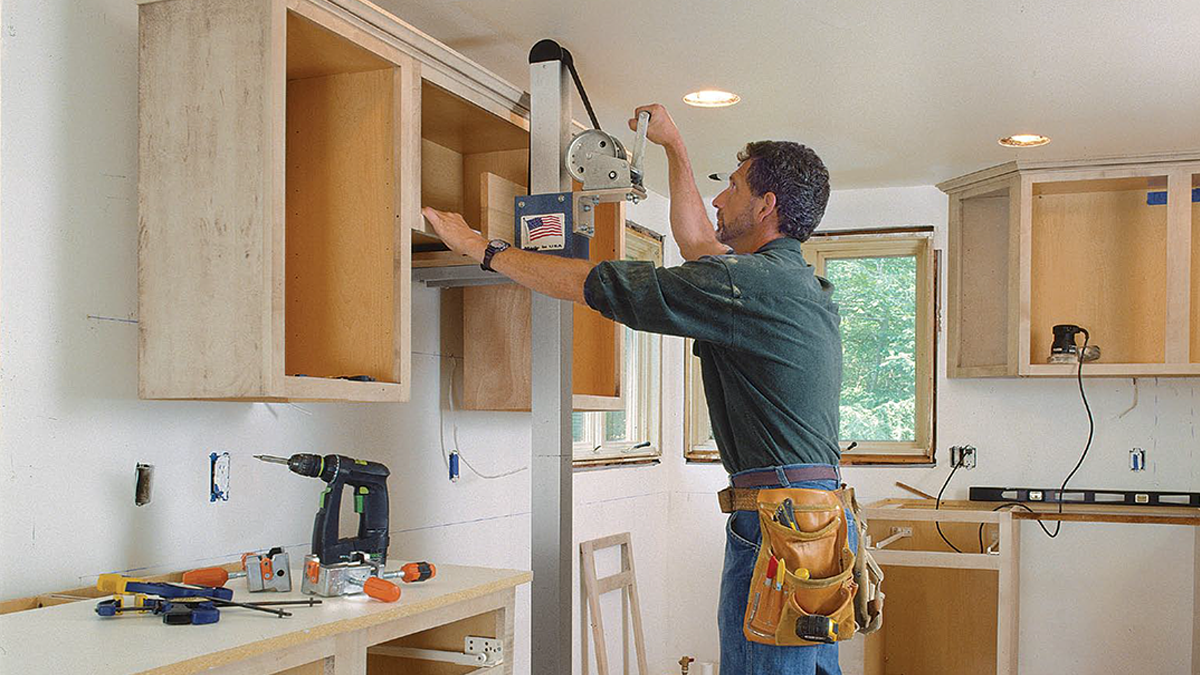
Installing a Ledger Board
A temporary ledger holds cabinets while you secure them. It makes one-person installs much easier.
- Mark the cabinet top line on the wall.
- Attach a straight 1×4 or 2×4 ledger to that line using long screws into studs.
- Confirm the ledger is level across the full run.
- Use the ledger as a shelf to support cabinets during fastening.
I use a ledger on nearly every project. It keeps the cabinets steady and frees my hands to drive screws. A level ledger is the backbone when learning how to mount kitchen cabinets.
Hanging Wall Cabinets: Step-by-Step
Follow a clear sequence to hang wall cabinets safely and squarely. These steps show how to mount kitchen cabinets efficiently.
- Prepare the first cabinet
- Remove doors and drawers for lighter handling.
- Place the cabinet on the ledger and align it with the layout marks.
- Fasten to the wall
- Drive long cabinet screws through the cabinet back into studs.
- Use two screws per stud at top and bottom of the cabinet.
- Join cabinets to each other
- Clamp two cabinets together and drive 1.5-inch screws through the face frames or through the interior rails.
- Check alignment and adjust before final tightening.
- Continue the run
- Place subsequent cabinets on the ledger.
- Join and fasten each cabinet to studs and to its neighbor.
- Reattach doors and adjust hinges
- Reinstall doors and set hinge screws to align gaps.
- Verify the run is level and plumb.
When I teach people how to mount kitchen cabinets, I stress using clamps and temporary screws first. That prevents minor misalignments from becoming permanent. A common mistake is over-tightening early, which pulls cabinet faces out of alignment.

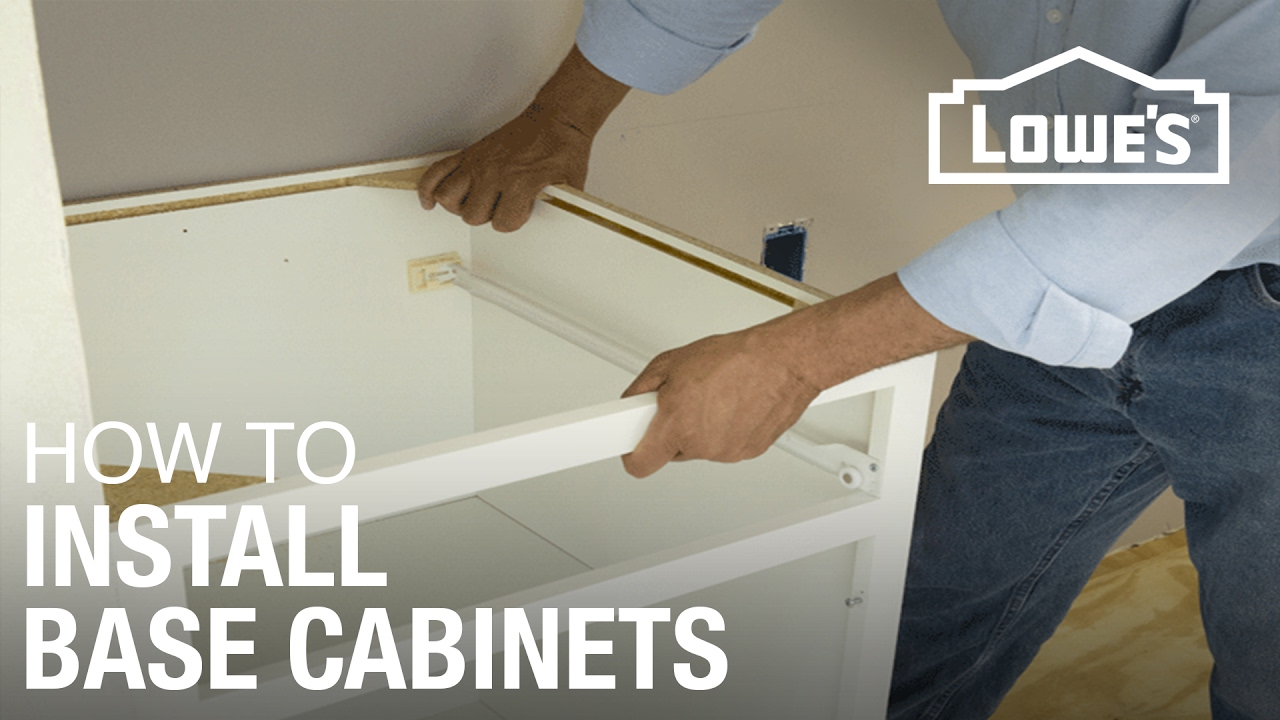
Installing Base Cabinets
Base cabinets set the countertop height and support surfaces. Install them carefully for a flat, level run.
- Place base cabinets without the toe kick and countertop.
- Shim under cabinet bases to make each cabinet level and plumb.
- Clamp and screw adjacent base cabinets together through the cabinet sides.
- Leave final countertop attachment until after leveling and plumbing adjustments.
I once installed a base run without shimming and had a visible dip. Shims are small but vital when you mount kitchen cabinets and want a perfect counter.
Adjusting, Shimming, and Leveling
Fine adjustments make cabinets look custom. Take time to shim and tweak.
- Use thin plastic or wood shims at the top and bottom where cabinets meet the wall.
- Check level and plumb at each step with a spirit level or laser.
- Trim shims flush and use caulk or filler for small gaps.
- Tighten screws after confirming level to lock the position.
Focus on small fixes early. When you mount kitchen cabinets and get them level before countertops go on, you avoid costly rework. I always recheck levels after a day of settling to catch any movement.

Securing Cabinets Together and Final Touches
After mounting, finish strong with secure joins and sealing.
- Fasten cabinets to each other with screws through internal rails or face frames.
- Install crown molding, filler strips, and trim where needed.
- Reinstall doors, drawers, and hardware.
- Seal gaps against the wall with caulk and paint touch-ups.
In my experience, the last 20 percent of work makes cabinets look high end. Take time to fit trim and adjust door gaps after you mount kitchen cabinets. This is where craftsmanship shows.
Troubleshooting Common Problems
Problems can appear. Here are quick fixes when you mount kitchen cabinets.
- Cabinets not level: Add or adjust shims under cabinet base or behind top rails.
- Screws miss studs: Use toggle bolts or add blocking behind drywall for support.
- Gaps between cabinets: Use filler strips or adjust cabinet positions with shims.
- Heavy cabinets sag: Add extra screws into studs or install plywood backing for more support.
I often see people underestimate cabinet weight. When you plan how to mount kitchen cabinets, always overbuild support slightly. It prevents sagging over time.
Safety Tips and Best Practices
Work safely to protect yourself and the cabinets.
- Wear eye protection and gloves during drilling and lifting.
- Lift with help for heavy units or use a cabinet jack.
- Turn off power when working near electrical wiring.
- Use screws rated for cabinet mounting and avoid short fasteners.
Safety matters more than speed. When I teach how to mount kitchen cabinets, I require at least two people for wall cabinets wider than 30 inches. It prevents accidents and saves time.
Frequently Asked Questions of how to mount kitchen cabinets
How high should wall cabinets be above the countertop?
Standard height is 18 inches from the countertop to the bottom of wall cabinets. Adjust based on appliance size and user reach for comfort.
What type of screws should I use to mount cabinets?
Use 2.5- to 3.5-inch wood screws or cabinet screws rated for structural loads. Drive screws into studs whenever possible.
Can I mount cabinets to drywall only?
Mounting to drywall alone is not recommended for permanent installs. Add blocking or use heavy-duty anchors if studs are not available.
How many people are needed to hang wall cabinets?
Two people are best for most cabinets, though a ledger can let one person work. Larger or heavier units require at least two helpers for safety.
Do I need a professional to install kitchen cabinets?
Many homeowners can learn how to mount kitchen cabinets safely. Hire a pro if you face complex plumbing, wiring, or structural issues.
Conclusion
This guide walks you through how to mount kitchen cabinets from planning to finishing touches. Start by measuring well, marking studs, and using a level ledger for support. Take your time with shims and joins to get a straight, strong result. Try one small run first to build confidence and skill. If you enjoyed this guide, subscribe for more detailed projects, ask questions below, or share your cabinet project photos to get feedback.