
Build sturdy, custom kitchen cabinets by planning, measuring, cutting plywood, assembling boxes, and finishing.
I have built many cabinets for clients and for my own home. This guide on how to create kitchen cabinets draws on hands-on experience, industry know-how, and step-by-step best practices. You will learn how to plan, what tools to use, how to cut and join parts, how to finish, and how to install cabinets with confidence. Read on to gain clear, practical instructions and tips that save time and get professional results.
:strip_icc()/20190521_meredith_002-2ad3962f1e604e499b8ce59ebe6481c6.jpg)
Planning and design for how to create kitchen cabinets
Good work starts with good plans. Decide cabinet style, layout, and budget first. Measure the kitchen carefully. Note plumbing, windows, doors, and appliances. Draw a simple floor plan and elevation views. Use online cabinet design tools or sketch by hand.
Choose a cabinet type. Face-frame cabinets have a framed front. Frameless (Euro) cabinets use full panels and offer more storage space. Pick one based on style and skill. Decide door style: slab, shaker, or inset.
Plan material and finish early. Plywood boxes with solid wood face frames are common. MDF doors are a budget option. Solid wood doors cost more but look classic. Plan hardware and hinge type. These choices affect tools, time, and cost.

Tools and materials needed to create kitchen cabinets
A clear tool list makes the project smooth. Gather basic and power tools. Use quality safety gear.
Tools you will need:
- Circular saw or table saw for cutting panels
- Router with edge guide for dados and groove work
- Drill and pocket hole jig for joinery and screws
- Jigsaw for cutouts and notches
- Clamps: bar clamps and K-body clamps
- Tape measure, speed square, and marking tools
- Random-orbit sander and sanding blocks
- Cabinet hardware jig for hinge and drawer placement
- Level and stud finder for installation
Materials you will need:
- Cabinet-grade plywood 3/4 inch for boxes
- 1/4 inch plywood for backs or MDF back panels
- Face frame stock or 3/4 inch plywood for frameless fronts
- Drawer box material or pre-made drawers
- Edge banding for plywood edges
- Wood glue, pocket screws, and wood screws
- Doors, drawer fronts, hinges, slides, and pulls
- Paint or stain, primer, and clear coat
Step-by-step cabinet construction: how to create kitchen cabinets
Follow these core steps to build cabinets. Work methodically and check measurements often.
- Prepare a cutting list and layout
- Measure twice and list every panel size.
- Label each piece with use and orientation.
- Cut panels and make dados or rabbets
- Cut side panels, tops, bottoms, shelves, and face frames.
- Use a table saw or router to cut dados for shelves and fixed parts.
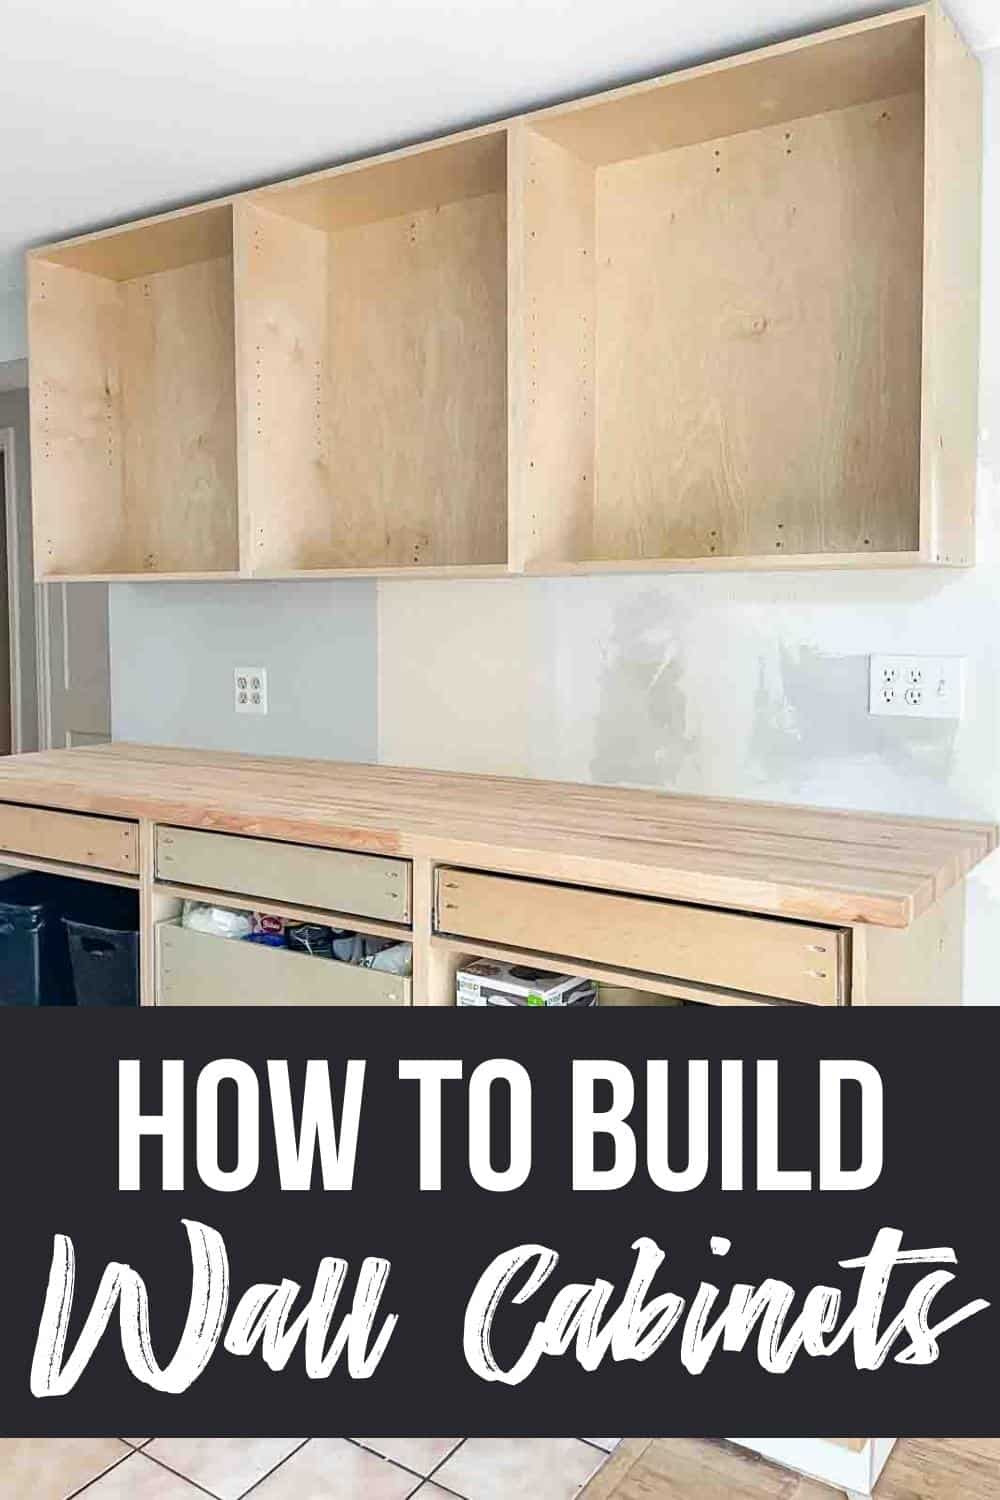
- Assemble the carcass (box)
- Apply glue in joints and clamp.
- Use pocket screws or biscuits for strength.
- Insert back panel into grooves and secure.
- Add face frames or edgebanding
- Attach face frame pieces to the front of the box if using face-frame style.
- For frameless, apply edge banding to exposed plywood edges.
- Build and install shelves and toe kick
- Use adjustable shelf pins or fixed dadoed shelves.
- Cut and attach toe-kick along the cabinet base.
- Make doors and drawer boxes
- Cut door panels to size. Allow reveal clearance of 1/8 to 3/16 inch.
- Construct drawer boxes using dovetail, box joints, or pocket screws.
- Fit drawer slides and test movement.
- Sand, paint, or stain doors and boxes
- Sand to smoothness with fine grit.
- Apply primer and finish in a dust-free area.
- Attach hardware and hinges
- Set hinge locations with a jig for consistency.
- Install soft-close mechanisms if desired.
- Dry-fit and final checks
- Assemble in the shop to ensure alignment.
- Make any small adjustments before installation.
These steps will help you make solid cabinets. Work in batches to save time. Cut all panels before assembly when possible. Small mistakes are easier to fix at this stage than after installation.
:strip_icc()/7003788_DeMattia_0279-e283f1f497224852a79f1fe1ab271f00.jpg)
Finishing and hardware: final touches when you create kitchen cabinets
A good finish protects the wood and makes cabinets look custom. Pick finishes that match your kitchen use and style.
Sanding and sealing
- Sand starting at 120 grit and finish at 220 grit for a smooth surface.
- Clean dust with a tack cloth before finishing.
- Apply a stain if you want color, then seal with polyurethane or lacquer.
Painting
- Use a good primer for MDF or plywood.
- Spray finish gives the best result, but brush or roll can work for smaller runs.
- Sand lightly between coats.
Hardware
- Use European concealed hinges for clean looks, or inset hinges for classic styles.
- Choose full-extension drawer slides for easy access.
- Install pulls and knobs after doors are mounted to ensure alignment.
Test doors and drawers for smooth motion. Adjust hinges to square doors. Replace any hardware that feels loose or uneven.
Installation and adjustment for how to create kitchen cabinets
Install cabinets safely and squarely. Proper installation makes cabinets last and look right.
Wall preparation and layout
- Locate studs and mark mounting heights.
- Use a ledger strip to support upper cabinets while you fasten them.
Mounting sequence
- Start with the most critical cabinet, often a corner base or a tall pantry.
- Shim between cabinet and wall to make cabinets plumb and level.
- Fasten cabinets together through stiles or face frames before anchoring to studs.
Alignment and finishing touches
- Caulk seams between cabinets and walls for a finished look.
- Install filler strips and scribe molding to match uneven walls.
- Fit countertops and sinks after cabinets are fixed.
Always check level and plumb frequently. Re-check after each cabinet is attached. This keeps doors aligned and drawer gaps even.
Common mistakes and how to avoid them when you create kitchen cabinets
Knowing common errors saves time and money. Here are pitfalls and fixes.
Mistake: Poor or rushed measurements
- Fix: Re-measure twice and account for appliances and clearances.
Mistake: Low-quality materials for structural parts
- Fix: Use cabinet-grade plywood for boxes for stability.
Mistake: Skipping dry fits
- Fix: Assemble one box or door dry to test fit before finishing all.
Mistake: Ignoring wall irregularities during install
- Fix: Use shims and scribe molding for a tight, neat fit.
Mistake: Over-tightening fasteners that split wood
- Fix: Pre-drill holes and use correct screw length. Test on scrap pieces.
I learned these from building cabinets for friends. Small errors early created big headaches at install. Take your time and test as you go.
Cost, time estimates, and when to hire a pro to create kitchen cabinets
Costs vary by material, size, and finish. Here are rough estimates and guidance.
Cost factors
- Plywood boxes and MDF doors are lower cost.
- Solid wood doors and custom finishes increase costs.
- Hardware quality affects price and longevity.
Time estimates
- A single 36-inch base cabinet takes a few hours for an experienced woodworker.
- A full kitchen of custom cabinets can take several weeks to build and finish.
When to hire a pro
- Hire a pro for complex layouts, plumbing or gas proximity, and when you need perfect finish.
- Consider a pro if you lack tools, time, or skill for precise joinery.
- A pro may save money in the long run through efficiency and fewer mistakes.
If your project involves structural changes or electrical moves, hire a contractor and coordinate trades.

Personal experience, lessons learned, and pro tips for how to create kitchen cabinets
I built my first kitchen cabinets with a friend and learned three big lessons. First, plan the workflow. Cut all panels at once. Then assemble in stages. This saves setup time.
Second, invest in a good router and clamps. They shorten the build time and improve joint quality.
Third, finish doors and drawers before installing them. I once painted cabinets after install. It made masking hard and paint uneven. Paint in the shop for cleaner results.
Pro tips
- Label every panel with its position and face orientation.
- Use painter’s tape for temporary holds when aligning doors.
- Keep a spare hinge and slide on hand for quick replacements.
These simple habits lead to smoother builds and better final results.
Frequently Asked Questions of how to create kitchen cabinets
What is the easiest way to start when learning how to create kitchen cabinets?
Start with a single base cabinet and make a cutting list. Build, finish, and install that cabinet first to learn key skills before scaling.
How long does it take to make a set of kitchen cabinets?
A skilled woodworker can make a full set in one to three weeks, depending on complexity and finish. Beginners should allow more time for learning and corrections.
What is the best material for cabinet boxes?
Cabinet-grade plywood is best for strength and stability. It resists warping and holds screws well, making it ideal for cabinet boxes.
Should I build face-frame or frameless cabinets?
Choose face-frame for classic looks and easier alignment. Choose frameless for more storage and a modern look. Skill level and tools may influence your choice.
Can I install soft-close hardware on existing cabinets?
Yes. Soft-close hinges and drawer slides can be retrofitted on many cabinets with the right hardware and minor adjustments.
Do I need special tools to make kitchen cabinets?
Basic woodworking tools suffice for simple cabinets. A table saw, router, clamps, and drill greatly improve speed and accuracy for custom builds.
Conclusion
Building your own cabinets is doable with the right plan, tools, and care. Follow clear steps: plan, measure, cut, assemble, finish, and install. Small checks and dry fits prevent big problems.
Take one cabinet at a time. Practice with a simple box before tackling a full kitchen. If the project feels too big, consult a pro. Share your progress, ask questions, and keep learning. Try a small cabinet this weekend and see how rewarding custom work can be. Leave a comment or subscribe for more step-by-step projects and tips.